Configuring Your DOCPACE® Manager Dashboard
The Configure page in DOCPACE® Manager allows you to customize alerts, icons, and notifications to fit your workflow. By tailoring these settings, you can improve efficiency, stay informed in real-time, and ensure your dashboard displays the most relevant information for your practice.
Each alert, icon, and notification is explained in greater detail on its dedicated Knowledge Base page.
Need help deciding which settings are right for you? Contact your DOCPACE® Customer Success Manager — our support has a 5-star track record.
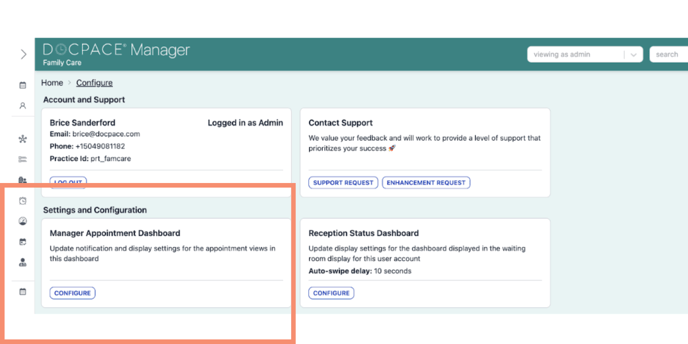
Accessing the Configuration Page
- Click the Gear Icon ⚙️ in DOCPACE® Manager.
- In the Manager Appointment Dashboard section, click Configure.

Configuration Categories
Settings are divided into two main groups:
- Patient Flow – Controls alerts for timeliness and slot availability.
- Display Settings – Adjusts how information appears on your dashboard.
Note: You must check the box ☑️ or enter a number [ ] for the setting to take effect.
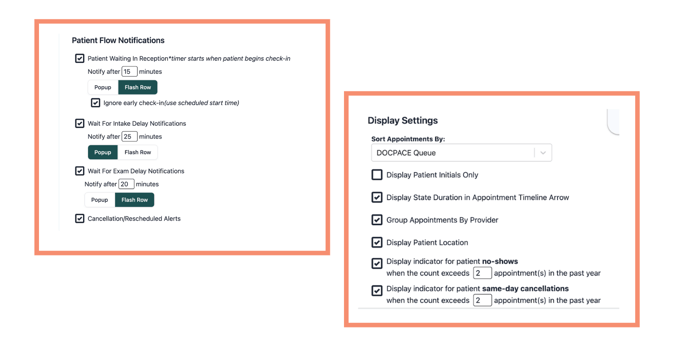
Patient Flow Settings
These settings allow you to create pop-ups and visual alerts to identify bottlenecks in patient flow and highlight newly available slots from same-day cancellations or reschedules.
Wait Time Alerts
You can set alerts to notify you when a patient has waited longer than your input time. Two alert formats are available:
- Popup – Displays a notification on any DOCPACE® page when the threshold is met.
- Flash Row – Highlights the patient’s appointment row in color based on their encounter stage.
Note: Popups appear regardless of which DOCPACE® page you’re viewing, ensuring you don’t miss delays.
Patient Waiting in Reception
Timer starts when the patient begins check-in, and alerts when a patient exceeds your set wait time in check-in or intake.
Options:
- Notify after [ ] minutes
- Popup or Flash Row
- Ignore early check-in (uses scheduled start time instead)
.png?width=688&height=344&name=settings%20(3).png)
Tip: Turn on “Ignore early check-in” so early arrivals don’t trigger alerts unnecessarily.
Wait for Intake Delay
Alerts when a patient waits longer than the input time for intake.
Options:
- Notify after [ ] minutes
- Popup or Flash Row
.png?width=688&height=344&name=settings%20(2).png)
Wait for Exam Delay
Alerts when a patient waits longer than the input time to see the provider.
Options:
- Notify after [ ] minutes
- Popup or Flash Row
.png?width=688&height=344&name=settings%20(4).png)
Tip: Set thresholds based on your DOCPACE® Analytics averages so alerts indicate true delays rather than normal flow.
Cancellation / Reschedule Alerts
Notifies you when an appointment for today has been cancelled or rescheduled.
- Displays a red popup with:
- Appointment time
- Provider name
- Patient name
- Dismissal:
- Patient Flow popups close automatically when the patient moves to the next stage.
- Cancellation/Reschedule alerts must be manually dismissed.
Display Settings
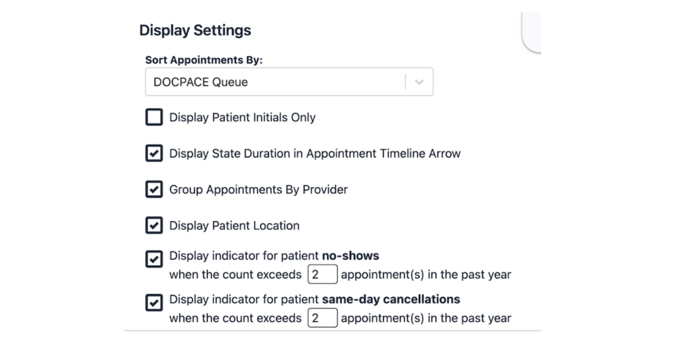
These settings control how information appears in your DOCPACE® Manager. They only affect your DOCPACE® view and can be changed anytime.
Sort Appointments By
- DOCPACE® Queue (Default)
- Uses patented stacking algorithm.
- Groups patients by appointment encounter stage.
- Moves cancelled, rescheduled, no-show, and force-paused appointments to the top.
- Scheduled Start
- Displays appointments chronologically by start time.
- Cancelled/rescheduled appointments remain in place.
Display Patient Initials Only
Replaces full names with initials in the Manager view and popups.
Tip: We recommend public spaces to maintain HIPAA compliance.
Display State Duration in Timeline
- ON: Shows total time spent in all completed encounter states.
- OFF: Shows only time in the current encounter state.
Tip: We Recommend to keep ON for full time-tracking.
Group Appointments by Provider
ON:
- Individual View: “Show Only Upcoming/Recent Appointments” button appears.
- Grouped View: Separates providers alphabetically with the same button option.
- OFF: Combines all providers into one schedule with provider name under patient name. Order depends on your “Sort Appointments By” setting.
Display Patient Location
- ON: Shows the patient’s current location under their name.
- OFF: Hides patient location.
Note: If patients remain in “Waiting Room” throughout, contact your CSM for athenahealth workflow training.
Indicators for No-Shows
Adds an icon + tooltip for patients who exceed your set no-show count in the past year.
Option: Trigger when count exceeds [ ] appointments.
Indicators for Same-Day Cancellations
Adds an icon + tooltip for patients who exceed your set same-day cancellation count in the past year.
Option: Trigger when count exceeds [ ] appointments.
Display Appointments Cancelled Within Last [ ] Hours
ON: Keeps recently cancelled/rescheduled appointments visible for the set time.
OFF: Removes cancelled/rescheduled appointments from the schedule immediately.
Display order is based on your “Sort Appointments By” setting.