
Go to athenanet.athenahealth.com
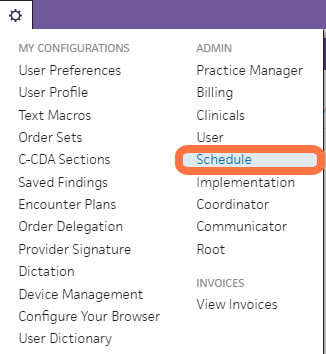
Click on the "Gear" icon in the main toolbar
Click on "Schedule"
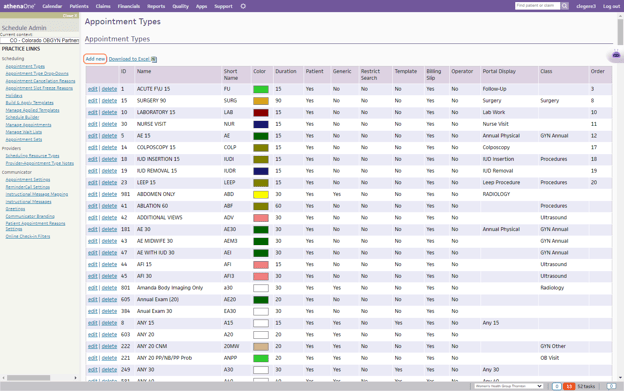
Click on "Appointment Types"
Click on "Add new"
You can either click "Add new" or utilize one of your existing Appointment Types. In this example, I will be creating a new Appointment Type to show you all of the associated features.
Fill out all necessary fields for a New Appointment Type
Name: Name the appointment type based on what your needs are.
-
- Examples: New Patient 15, Surgery 30, Existing Patient GYN 15
Short Name: Enter a unique short name that is four characters or fewer. This short name appears in the Today's Appointments worklist and in the schedule.
-
- NOTE: Choose this name carefully! After you schedule an appointment of this type, you cannot edit the short name.
- Examples: NP15, SX30, EP15
(Optional) Appointment Type Class: Select the appointment type class from the menu; this can help with reporting for specific classes.
Schedule color: Click Select to choose a background color for the appointment type.
Ordering: Enter a number to indicate the order of the appointment type. If blank, the list is ordered alphabetically.
Notes: Enter any notes for this appointment type. These will appear on the confirmation page after you schedule an appointment.
Under the "Scheduling" section, you will see the following fields:
Patient Time: If marked "Yes," an appointment type can be used to schedule patient visits. If "No" is selected, the appointment type cannot be searched for or scheduled for a patient visit.
Generic Slot: If "Yes," an appointment type will be included in search results, regardless of the appointment type being scheduled.
-
- Generic slots should be appointments that can be booked in any slot—i.e., Any appointments
- If you are using a third-party system to help book appointments, please review ALL appointment types with that vendor as it will affect how their system works with your scheduling!
Restrict Search Results: If "Yes" is selected, generic slots will not be included in search results when this appointment type is scheduled.
Template Only: If marked "Yes," this appointment type will be returned in search results, but a non-template appointment type must be selected to schedule the appointment.
Billing Slip Required: Select "Yes" to have the Missing Slips worklist display appointments of this type.
Under the "Patient Portal" section, you will see the following fields:
Allow Operators to Schedule: If "Yes" is selected, athenahealth operators may schedule the appointment type during reminder calls.
Display Name: Enter the name for this appointment type as it should appear on the Patient Portal.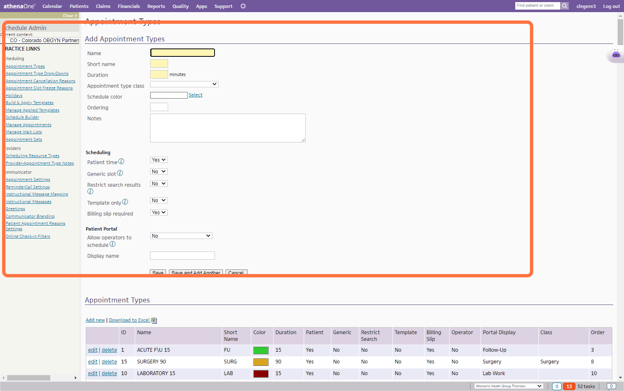
Click "Save" once you are complete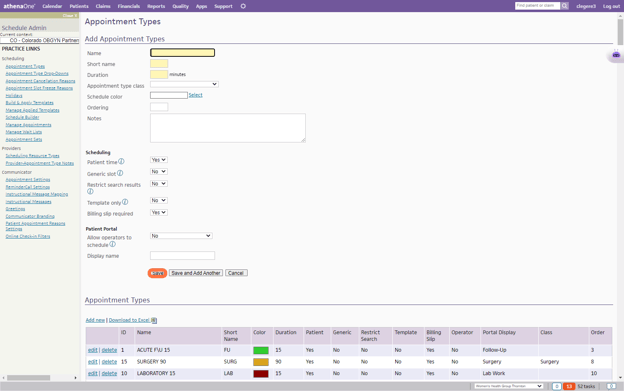
Click on "Appointment Type Drop-Downs"
If you are creating a new appointment type, do not forget to add it to the appropriate department.
Click "edit" next to the department you need to add an appointment type to
Select the appointment type and click "Save."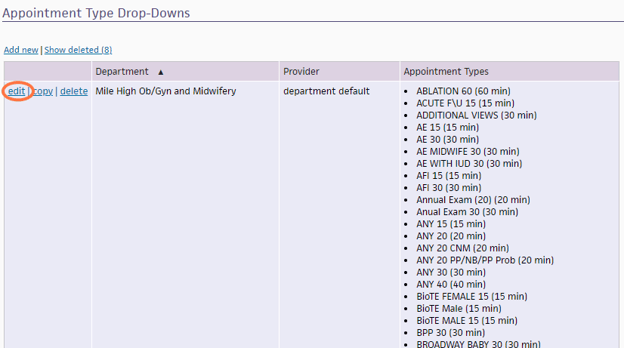
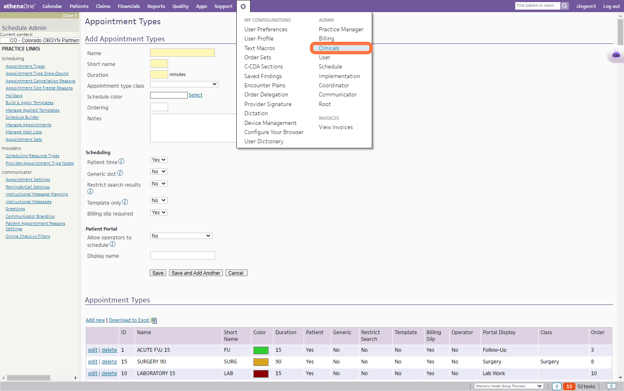
Next, click onto your "Gear" icon in the main toolbar
![]()
Click on "Clinicals"
Click on "Assign Appointment Types to Layouts"

Convert your Appointment Types to the correct Layout

Layout: Select an encounter layout from the menu.
Specialty: Select a specialty. Note: These are the specialties that you have selected on your provider profile page.
Assign Appointment Types to Encounter Layout: Select the appointment types that should use the selected layout.
Click "Add."
Special Notes for each Appointment Type Encounter Layout
Standard Office Visit: This layout follows the traditional 5-stage visit and contains the Check-in, Intake, Exam, Sign-off, and Checkout stages. By default, all appointment types use the Standard Office Visit layout unless you assign the Exam-Only Visit or Nurse Visit encounter layout to an appointment type on the Assign Appointment Types to Layouts page.Exam-Only Visit: Use this layout for appointments that will be documented only by the provider, such as nursing home visits, Injections from Providers, and Athletic Trainers (on the field). The Exam-Only Visit layout includes the Check-in, Exam, Sign-off, and Checkout stages.
When an appointment type is mapped to an exam-only layout:
-
- Clicking an Exam-Only encounter opens the Exam briefing, and Go to Exam is the only option in the green action button.
- The colors on the schedule indicate that the encounter does not have an Intake stage.
One-Stage Focused Visit: For short appointments — such as an injection, sick visit, or postoperative visit — you can document the encounter on a single page that includes only the sections you need.
There are two options here:
-
- One-Stage Focused Visit
- One-Stage PT-Focused Visit (you can only use this option if you have a PT specialty)
Practices most commonly assign the One-Stage Focused Visit or One-Stage PT Focused Visit encounter layout to the following appointment types:
-
- Post-op
- Injections
- Workers Compensation
- Vaccines
- Flu shots
- Lab-only visits
- Physical therapy evaluations
- Occupational therapy evaluations
- Behavioral health evaluations
- Care management follow-ups
- Nurse visits
Standard Sections for One-Staged Focused Visits
These sections are shown in the Document stage of the encounter by default.
One-Stage Focused Visit
-
- Reason for Visit
- History of Present Illness
- Review of Systems
- Physical Exam
- Procedure Documentation
- Assessment & Plan
One-Stage PT-Focused Visit
-
- Reason for Visit
- Physical Therapy Episodes
- History of Present Illness
- Review of Systems
- Physical Exam
- Procedure Documentation
- Exercise Flowsheets
- Assessment & Plan
-
- Vitals
- Screening
- Patient Goals
- Patient Instructions
- Discussion Notes
- Follow Up
- Letters
- Documents for Discussion
Practices with Specific Features Enabled
OB FeatureFor practices with the OB feature enabled in at least one department, the default encounter layout is the OB Standard Office Visit layout. On the Assign Appointment Types to Layouts page, you can assign a different encounter layout to some appointment types, for example:
-
- OB Nurse Visit layout
- OB Exam-Only Visit
- OB Structured Procedure Visit (for practices with the Structured Procedure Documentation feature enabled)
- OB Exam-Only Structured Procedure Visit (for practices with the Structured Procedure Documentation feature enabled)
Physical Therapy feature
For practices with the Physical Therapy feature enabled in at least one department, the default encounter layout for the Physical Therapy and Phys. Med. & Rehab. specialties is the One Stage Physical Therapy Visit layout.
Note: To use the One Stage Physical Therapy Visit encounter layout for other specialties, configure those specialties with appointment types to use this layout on the Assign Appointment Types to Layouts page.
Structured Procedure Documentation feature
For practices with the Structured Procedure Documentation feature enabled in at least one department, the Assign Appointment Types to Layouts page provides Structured Procedure Visit encounter layouts, including OB Structured Procedure Visit and Exam-Only Structured Procedure Visit.Eye Care Workflow feature
For practices with the Eye Care Workflow feature enabled in at least one department, the Assign Appointment Types to Layouts page provides these layouts: Eye Care Visit and Exam-Only Eye Care Visit.